Introduction
This week we received lots of feedback from faculty. Some feedback is constructive and reminds us of the constraints that we have. We spent time discussing the problems we have with the current plan and revised it to something that is more in scope. We brought it up with our client, and together we came up with a better final goal — a proposal for a prototype that helps kids to explore the art and science of color. The team also brainstormed some new activities and did some initial hardware testing.
¼ Walkarounds
On Monday this week, we presented our ideas to 6 groups of faculty members from the ETC. We received some constructive feedback and some references that we should look into. Some faculty members were not very convinced that a box would be the right form factor. They believe we should find the right activities first before we land on the box. There were also concerns about the longevity and the maintenance of the product. They suggested we should make at least a duplicate of the final product, many spare parts as well as a manual for whoever is going to take care of the product. The faculty also cautioned us to make sure that we don’t include both pigment colors and light colors, because it will likely confuse younger kids.
The faculty recommended 4 references that we should look into:
- Blue’s Clues (Season 5 Episode 1 – Colors Everywhere)
- Practical Pigment Mixing for Digital Painting (https://www.youtube.com/watch?v=_qa5iWdfNKg)
- The Tipping Point – Chapter 3
- West Virginia Common Core Standards
Back to Brainstorming
After receiving the feedback, we decided to go back to brainstorming. We thought of some new activities and the potential themes that we could use. Here are some of the new ideas:
1. Light mixing through sliders: Introduce additive color mixing by having two colors across from each other and sliders below them. The sliders ‘move’ (really just turns on and off lights below it) where the lights are until they meet in the center→ pull two sliders towards the center to make the new color. The team is also inspired by the RGB box made by MIT Media Lab. We are interested in doing further research and incorporating it with our design. (https://www.media.mit.edu/projects/rgbox/overview/)

2. Shadow puppets: A ‘screen’ (essentially a white translucent panel) and 3 small joystick-like levers that pivot 3 lights (RGB) inside the box. Start with all of them ‘off’ so that only white light is shining through. Students can stick little shadow puppets (not sure what material yet) in through a slot and then move the lights around to make a ton of multicolored shadows for the puppet. This will show additive color mixing. (Inspiration: Physics Simulation: Color Addition and Subtraction)

3. Make a rainbow with a prism: Make a rainbow using a prism. Similar mechanic to the shadow one. Use a joystick-like lever to move a white LED light around inside the box to try to get it to hit the prism correctly and create rainbows.

4. Lightwave Matchup: A Light with a mini LED screen next to them and a knob underneath the screen. The lights are a certain color (they can be randomized) and on the screen is an animated wave that is the color of its frequency. Use the dial to match the wave frequency to the color. Ding! Another random color.

Light Experiment and Tech Testing
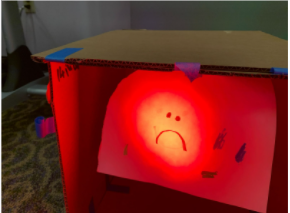
We checked out some DMX LED fixtures from the ETC. We did two experiments with them:
- Hidden message: we drew a smiley face and a sad face with markers of two different colors. Under red light, the sad face will appear; under green light, the smiley face will appear; under blue light, both will appear.
- Create an animation effect with light: we created a line drawing of an explosion with markers of different colors. By switching different lights on and off, we created an effect that’s similar to a simple animation.
Wizard tested tech with an arduino and LED strip. There are 3 buttons for the primary colors of light. The LEDs respond to single button presses as well as combinations that will display the mixture of the colors pressed.
Client Update
During our client meeting this week, we talked about the feedback that we received from the faculty. We showed our client the light experiment that we did, then we proposed some new ideas. The client expressed some of their concerns about the “Hidden Message” activity, saying that it may be better for older kids rather than younger ones.The client thinks that we can go deeper in one specific direction and build several activities around it. They have mentioned that kids are more likely to enjoy doing the same activity repetitively than adults, and if we put together similar activities with different themes, they won’t necessarily feel they are repetitive.
Dilemma
Since many of the faculty are concerned about the longevity and maintenance of the product, we asked our client how long they expect to use the product. The client expressed that they would like to keep it longer and potentially would travel with it to the classroom. The team has the concern that if we spend a long time testing the durability of the product, we wouldn’t have time to explore and discover activities that are actually engaging. We then further discussed the form of the final product and proposed 3 options.
-
Answering some questions?
- What activities are best?
- Which serves the purpose really needed?
-
Proposal for prototype ?
- How to build it but not tested
- CAD designs and documentation
- Cardboard prototype.
-
Something that works and is shippable?
- We make something durable
- But it might not be the best possible solution. Not enough exploration
We talked about the pros and cons of each option. Our client thinks that making a “proposal for prototype” is the better option, as it will give them some deliverables to show to kids, and enough information to fully develop it in the future. Our client acknowledges that this project is also a learning experience for the team and believes that we can get the most out of it this way rather than spending most of our time building the hardware.
Playtesting
We are planning on going to the Center of Art and Education at West Liberty University on February 14, 2020 to test some prototypes. To give us a better understanding of the environment and the kids, our client showed a video of kids participating in the Global School Play Day event that they hosted. The team is very excited and inspired seeing that kids are playing happily. We are looking forward to going into the center and getting some honest feedback from the kids.


